
Running k3s on a Raspberry Pi 4
A complete walkthrough from bare hardware to a working Kubernetes cluster.
May 27, 2026
I had a Raspberry Pi 4 sitting in a drawer. Turns out it makes a pretty good Kubernetes node.
I set up a Raspberry Pi 4 as a Kubernetes node running k3s. This covers everything from hardware to a working cluster with remote kubectl access.
If you are studying for the KCNA or CKA, or just want hands-on time outside of a managed service, this is a good way to do it. Running it yourself on real hardware shows you what a managed cluster handles for you. If you want a structured lab to go alongside this, I put one together: Studying for KCNA by Actually Building Things.
Hardware
The 4GB or 8GB Pi 4 works well as a Kubernetes node. Skip the 1GB and 2GB models. Kubernetes takes up memory before your workloads run, and you will constantly be fighting resource pressure on a 2GB board.
SD Card
SD card performance matters more than people expect. Kubernetes is constantly reading and writing small files: etcd state, container layers, kubelet checkpoints, logs. A slow card causes cascading failures that are genuinely confusing to debug. Look for at least A1 class and do a bit of research on current recommended brands before buying.
Longer term, booting from a USB SSD is the better call. SD cards have limited write endurance and k8s workloads are write-heavy.
Operating System
Use Ubuntu Server 24.04 LTS (64-bit ARM). A few reasons:
- 64-bit is required. Most k8s tooling does not support 32-bit.
- LTS means 5 years of support (until 2029). Non-LTS releases have a 9-month window and force disruptive upgrades on cluster nodes.
- No desktop environment. All resources go to workloads.
- Most Kubernetes documentation and community guides assume Ubuntu. That matters when you are debugging at 11pm.
How you flash the image depends on your OS. The Raspberry Pi Imager is the easiest option and handles most of it for you, but there are other tools depending on what you are working with. Worth looking up the right approach for your setup.
Why k3s Instead of Full Kubernetes
Full Kubernetes with kubeadm is too heavy for a Pi. etcd alone is 200-300MB. The control plane components together are 1GB+ at idle. On a 4GB board that leaves very little room for actual workloads.
k3s is a CNCF-certified distribution built for exactly this. It replaces etcd with SQLite, bundles everything into a single binary, and idles at around 500-600MB. It is fully API-compatible with upstream Kubernetes, so everything you learn here applies to a production cluster.
First Boot
Give it a couple minutes. Ubuntu Server runs cloud-init on first boot and it takes a moment. Then:
ssh yourusername@yourhostname.local
One thing that bit me: if you use a terminal like Ghostty, the remote shell might not recognize your $TERM value and TUI apps like nano will break. Fix it:
echo 'export TERM=xterm-256color' >> ~/.bashrc && source ~/.bashrc
Then update and reboot:
sudo apt update && sudo apt upgrade -y
sudo reboot
Networking
Use ethernet. Node IP addresses must not change or k8s will treat instability as node failure and start evicting pods.
WiFi works for a home lab, but any connectivity hiccup shows up as a node failure. That can send you chasing the wrong problem.
Ubuntu 24.04 uses Netplan for network config. Edit /etc/netplan/50-cloud-init.yaml:
network:
  version: 2
  ethernets:
    eth0:
      dhcp4: false
      addresses:
        - 192.168.1.x/24
      routes:
        - to: default
          via: 192.168.1.1
      nameservers:
        addresses:
          - 192.168.1.1
          - 8.8.8.8
sudo netplan apply
sudo reboot
After reboot, verify the static assignment:
ip a show eth0
# Look for: valid_lft forever (no "dynamic")
YAML is whitespace-sensitive and paste artifacts will corrupt the file. Write it from scratch rather than trying to fix a corrupted version.
Kubernetes Prerequisites
These steps configure the Linux kernel and runtime environment that Kubernetes depends on. Do all four before installing k3s. The official reference for all of this is the Kubernetes container runtimes doc.
1. Enable cgroups v2
Control groups (cgroups) are how the Linux kernel enforces resource limits on processes: CPU, memory, I/O. Kubernetes relies on them to enforce the limits you set on containers. On a Raspberry Pi, memory cgroups are not enabled by default. Without them, the kubelet either fails to start or runs in degraded mode, and container memory limits are not enforced. That means nodes can run out of memory (OOM) and start killing processes without Kubernetes being aware. The k3s docs call this out explicitly for Raspberry Pi.
sudo sed -i '$ s/$/ cgroup_enable=memory cgroup_memory=1/' /boot/firmware/cmdline.txt
Verify:
cat /boot/firmware/cmdline.txt
# cgroup_enable=memory cgroup_memory=1 should appear at the end of the line
2. Disable Swap
By default, the kubelet will not start on a node that has swap enabled. The scheduler makes decisions based on available memory. Swap lets the OS silently use disk as memory, which makes resource accounting unreliable. The Kubernetes swap documentation covers the details. Swap support is in beta for cgroup v2 nodes as of 1.28, but disabling it is still the recommended default and what k3s assumes.
# Disable immediately
sudo swapoff -a

# Persist across reboots
sudo sed -i '/ swap / s/^/#/' /etc/fstab

# Verify (swap row should show 0B 0B 0B)
free -h
3. Load Required Kernel Modules
Two modules are required. Both are called out in the Kubernetes container runtimes prerequisites.
overlay is the filesystem driver containerd uses to manage container layers efficiently. Instead of copying files for each container, it stacks layers on top of each other: the image is read-only at the bottom, and a thin writable layer sits on top for that container's changes.
br_netfilter allows iptables rules to see traffic crossing Linux bridge interfaces. Without it, pod-to-pod traffic crosses the bridge and bypasses iptables entirely, which breaks kube-proxy and network policies.
cat <<EOF | sudo tee /etc/modules-load.d/k8s.conf
overlay
br_netfilter
EOF

sudo modprobe overlay
sudo modprobe br_netfilter
4. Configure Sysctl Parameters
Also from the Kubernetes container runtimes prerequisites:
cat <<EOF | sudo tee /etc/sysctl.d/k8s.conf
net.bridge.bridge-nf-call-iptables  = 1
net.bridge.bridge-nf-call-ip6tables = 1
net.ipv4.ip_forward                 = 1
EOF

sudo sysctl --system
What these do:
net.bridge.bridge-nf-call-iptables = 1: passes bridged IPv4 traffic through iptables. Required for kube-proxy and network policies. The ip6tables line does the same for IPv6.net.ipv4.ip_forward = 1: lets the node forward packets between interfaces. Required for pod-to-pod traffic across nodes.
Container Runtime
Kubernetes does not run containers directly. It talks to a container runtime via the Container Runtime Interface (CRI). containerd is the standard.
sudo apt install -y containerd
The default config needs two changes for Kubernetes:
sudo mkdir -p /etc/containerd
containerd config default | sudo tee /etc/containerd/config.toml

sudo sed -i 's/SystemdCgroup = false/SystemdCgroup = true/' /etc/containerd/config.toml

sudo systemctl restart containerd
sudo systemctl enable containerd
The SystemdCgroup = true setting matters. Ubuntu uses systemd as its init system, and systemd owns the cgroup hierarchy for every service it runs. If containerd uses a different driver, you end up with two processes managing the same resource hierarchy. The containerd docs call this a violation of the "single-writer" rule. The Kubernetes docs are direct about the result: two cgroup managers produce two different views of available resources, which causes instability under load.
sudo systemctl status containerd
# Look for: Active: active (running)
Installing k3s
curl -sfL https://get.k3s.io | sh -
One command. It detects ARM64, pulls the right binary, creates a systemd service, sets up kubectl and crictl symlinks, and writes a kubeconfig to /etc/rancher/k3s/k3s.yaml.
sudo systemctl status k3s
sudo k3s kubectl get nodes
Expected output:
NAME          STATUS   ROLES           AGE   VERSION
yourhostname  Ready    control-plane   Xm    v1.35.x+k3s1
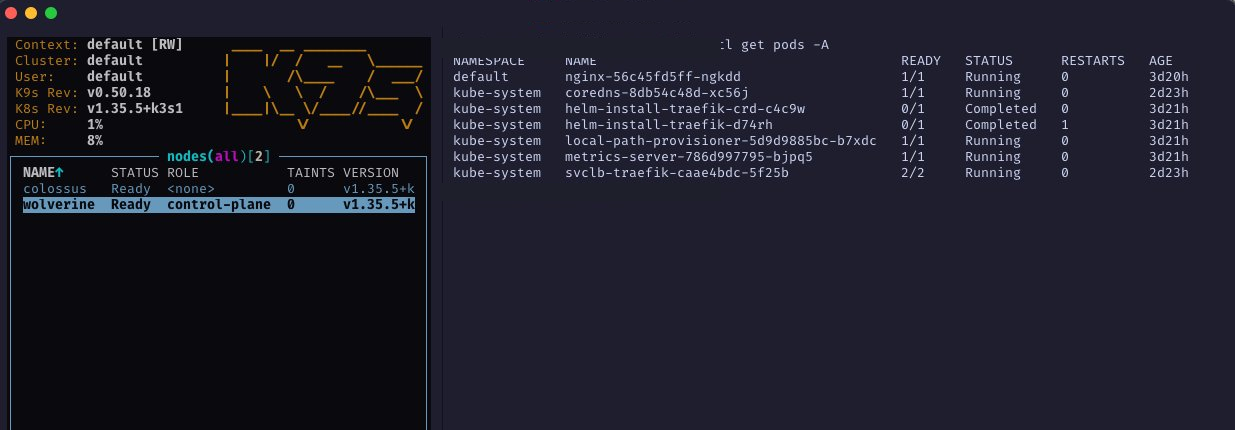
What k3s Installs Out of the Box
Unlike a bare kubeadm install, k3s ships with a full working stack. After installation you will find these already running in kube-system:
kubectl get pods -n kube-system
flowchart TD
    classDef external fill:#718096,stroke:#4a5568,color:#fff
    classDef traffic  fill:#4a90e2,stroke:#2c6fad,color:#fff
    classDef support  fill:#48bb78,stroke:#38a169,color:#fff
    classDef pod      fill:#ed8936,stroke:#dd6b20,color:#fff

    REQ(["External Request"]):::external

    subgraph sys["kube-system"]
        SLB["ServiceLB\ngives Traefik a real IP"]:::traffic
        TRF["Traefik\nroutes by host / path"]:::traffic
        DNS["CoreDNS\nresolves service names"]:::support
        MS["metrics-server\nCPU + memory stats"]:::support
        LPP["local-path-provisioner\nPersistentVolumes on node disk"]:::support
    end

    SVC["ClusterIP Service"]:::traffic
    POD("Your Pod"):::pod

    REQ --> SLB --> TRF --> SVC --> POD
    DNS -. "name → IP" .-> SVC
    MS -. "monitors" .-> POD
    LPP -. "mounts PV" .-> POD
CoreDNS is the cluster's internal DNS server. Every pod and service gets a DNS name. When a pod says "connect to my-service", CoreDNS resolves it to an IP. Without it pods can only talk by IP, which breaks almost everything.
Traefik is the default ingress controller. Listens on 80 and 443, routes HTTP traffic to services by hostname.
ServiceLB is k3s's bare-metal load balancer. In a cloud environment a LoadBalancer service provisions a cloud LB automatically. On bare metal there is no cloud provider. ServiceLB fills that gap by running a pod on each node that binds to the host network and forwards traffic.
metrics-server: collects CPU and memory usage from every node and pod. Required for kubectl top and horizontal pod autoscaling.
local-path-provisioner: creates PersistentVolumes as directories on the node's local filesystem. Fine for a single node. For multi-node clusters, look at Longhorn instead.
Remote kubectl Access
Install kubectl on your daily driver using the official install guide. The kubeconfig on the Pi is owned by root, so copy it to the user's home directory first before pulling it down.
On the Pi:
sudo cp /etc/rancher/k3s/k3s.yaml ~/k3s.yaml
sudo chown yourusername:yourusername ~/k3s.yaml
On your local machine:
mkdir -p ~/.kube
scp yourusername@pi-ip:~/k3s.yaml ~/.kube/config

# k3s sets the server address to 127.0.0.1 by default. Fix it.
sed -i '' 's/127.0.0.1/your-pi-static-ip/g' ~/.kube/config

kubectl get nodes
Then clean up the temp file on the Pi:
rm ~/k3s.yaml
k9s is worth installing once things are running. It is a terminal UI for cluster management and makes navigating pods, logs, and events a lot faster than raw kubectl commands.
If you use Colima on macOS, it manages its own kubeconfig context separately. The k3s context and the Colima context coexist without conflict. Use kubectl config get-contexts to see all available contexts and kubectl config use-context to switch between them.
Adding Worker Nodes
Get the join token from the control plane:
sudo cat /var/lib/rancher/k3s/server/node-token
On the worker node, after completing all the prerequisites above:
curl -sfL https://get.k3s.io | K3S_URL=https://your-control-plane-ip:6443 K3S_TOKEN=your-node-token sh -
kubectl get nodes
# New node shows role: none initially, then worker
ARM64 and Multi-Architecture Clusters
The Pi 4 is ARM64. Mix it with x86_64 nodes and you have a multi-architecture cluster. Most images on Docker Hub are multi-arch, but some are x86_64 only and will fail to schedule on ARM nodes without any obvious error.
kubectl label node your-node-name kubernetes.io/arch=arm64
Worth knowing. Real-world clusters increasingly include ARM nodes like AWS Graviton. If a pod won't schedule and you can't figure out why, architecture mismatch is on the list.
Common Issues
Node shows NotReady after reboot
cat /boot/firmware/cmdline.txt     # verify cgroups are still set
sudo systemctl status containerd   # containerd running?
sudo journalctl -u k3s -f         # k3s logs
High memory pressure
free -h
kubectl top nodes    # requires metrics-server
k3s idles at 500-600MB. On a 4GB Pi that leaves about 3.4GB for workloads. If things are tight, check whether your pods have resource limits set.
SD card degrading over time
sudo iostat -x 1
If performance is dropping, move to USB SSD boot. It is the right call for anything you want to keep running reliably.
Pod networking issues
lsmod | grep br_netfilter
sysctl net.bridge.bridge-nf-call-iptables
sudo k3s kubectl logs -n kube-system -l app=flannel
Deploying Your First Workload
Once the cluster is up, deploy nginx and verify the full networking stack works end to end.
kubectl create deployment nginx --image=nginx
kubectl get pods -w
# Wait for STATUS: Running
Expose it as a service:
kubectl expose deployment nginx --port=80 --type=ClusterIP
A ClusterIP service gives the deployment a stable internal IP and a DNS name inside the cluster. The service name becomes its DNS entry, so nginx resolves to the service IP from anywhere inside the cluster.
Spin up a temporary pod and curl the nginx service by name:
kubectl run curl --image=curlimages/curl --rm -it --restart=Never -- curl http://nginx
You should get the nginx welcome page back. The --rm flag deletes the pod when it exits. That one command hits pod scheduling, container runtime, service networking, DNS resolution, and pod-to-pod communication. If it works, the cluster is healthy.
Where to Go From Here
A working single-node cluster is a starting point. Here is what to build toward next.
Expose workloads via Traefik Ingress
A ClusterIP service is only reachable inside the cluster. To access a workload from your browser, you need an Ingress resource. Traefik is already running on 80 and 443, so you just define the routing rules: deploy, expose as ClusterIP, write an Ingress. The Traefik docs cover the rest.
apiVersion: networking.k8s.io/v1
kind: Ingress
metadata:
  name: nginx
  annotations:
    traefik.ingress.kubernetes.io/router.entrypoints: web
spec:
  rules:
    - host: nginx.local
      http:
        paths:
          - path: /
            pathType: Prefix
            backend:
              service:
                name: nginx
                port:
                  number: 80
kubectl apply -f nginx-ingress.yaml
Add 192.168.1.x nginx.local to /etc/hosts on your workstation and open it in a browser. Traefik handles the rest.
Add a worker node
A second node gives Kubernetes something to actually schedule across. Any machine running Ubuntu Server works: another Pi, an old laptop, a mini PC.
Deploy something real
Replace the toy workloads with something you would actually use. These all run well on ARM64:
- Uptime Kuma: service monitoring with alerts. Good intro to PersistentVolumes.
- Pi-hole: network-wide DNS ad blocking. Requires host networking, teaches DaemonSets.
- Gitea: self-hosted Git. Multi-component app, teaches multi-service deployments.
- Homer: home lab dashboard. Simple stateless app, good for practicing Ingress.
If you are working toward the KCNA, my lab Studying for KCNA by Actually Building Things pairs well with a cluster like this one.
Version Reference
| Component | Version |
|---|---|
| Hardware | Raspberry Pi 4 Model B 4GB |
| OS | Ubuntu Server 24.04 LTS (64-bit ARM) |
| Kernel | 6.8.x |
| containerd | via apt (Ubuntu 24.04 repos) |
| k3s | v1.35.5+k3s1 (at time of writing) |
| Kubernetes API | v1.35.5 (at time of writing) |